Adding, editing and deleting Service Categories #
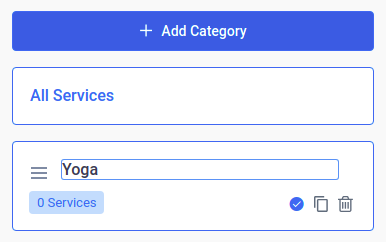
On the left side of the category page, you will see an “Add Category” button. Click on the it button, write the name of your category, click on the checkmark and your category will be saved. Once you’ve saved a category you can always edit, duplicate or delete it later, using the buttons on the righthand side of the category card.
Adding, editing and deleting Services #
After you have created at least one category you can start creating the services. Click on the “Add Service” button or the “+” button, and the “New Service” dialog will appear.
The “New Service” dialog is divided into three tabs:
- Service Details – The Service Details Tab is where you configure the most important services options. It consists of:

-
- Service photo – Click on the photo placeholder, upload the picture and this picture will appear on the back-end and on the front-end for that service.

-
- Service color – Click on the blue circle and you will see the colour options which you can set for each service. This colour will be used for differentiating services on the Calendar in the back-end.

-
- Name – Here you need to write the service name, which is required.

-
- Category – Here you need to select the category that this service belongs to.

-
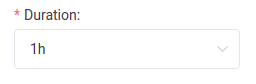
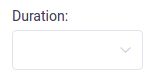
- Duration – Here you need to choose the service duration. Time slots you see in the “Duration” option are based on the setting defined in the “Default Time Slot Step” in “General Settings”. One more option that you can set regarding the service duration is Use service duration for booking a time slot in General Settings. This option you can use if you want to make time slot step the same as a service duration is in the booking process.
-
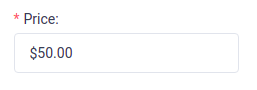
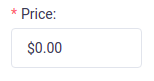
- Price – Here you need to enter the service price. The format of the price will follow the setting from the “Payments Settings”.
-
- Buffer Time Before and Buffer Time After – These options give you the possibility to set the time before and after the appointment that needs to be reserved so that another booking for the same service and employee would not be made. It will not be seen on the front-end, but it will reduce the number of free time slots in the schedule of the employee. “Buffer Time Before” can be interpreted as the time your employee needs to prepare for appointments, while “Buffer Time After” is the time after the appointment that your employee needs to rest, clean up, or do something else before being able to accept the next appointment. Like for the “Duration” option, time slots you see here are based on the setting defined in the “Default Time Slot Step” in “General Settings”.

-
- Minimum Capacity and Maximum Capacity – Here you can enter the minimum and the maximum number of persons per single service booking. If your company has a need for a group appointment (for example classes, tours, group training, etc.), this is where you’ll define its capacity. This option is available for every employee, so you can define a different capacity for each one.

-
- Show “Bringing anyone with you” option – Here you can choose whether you want to show or hide the “Bringing anyone with you” option. If you hide this option from the Booking form you will only allow individuals to book a group appointment.

-
- Multiple price by the number of people – Here you can choose whether the service and extras price will multiple by the number of people added with “Bringing anyone with you” option. By default, the option is enabled which means that the price multiples by the number of people added.

-
- Show service on site – Here you can choose whether the service that you create will be shown on site or not. By default, this option is enabled so services will be shown on the booking form on the front-end available for customers’ booking, but if you need to have some service just for making appointments on the back-end then you can disable this option for the specific service.

-
- Employees – Here you select the employees that will be assigned to the service.

-
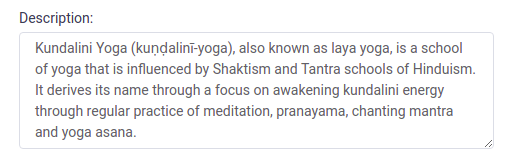
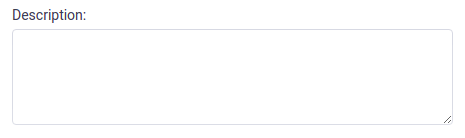
- Description – Here you can add a description that will appear on the front page if you use From version 1.4.4 you can also add HTML here in order to better customise your description.
- Gallery – In this tab, you can add images to your service. These images will show up on the front page of your service if you choose the “Front-end Booking Catalog”. By clicking on the “Add Image” button, you can upload images from your device or choose them from your media library. By dragging them, you can adjust their order in which they will be shown on the front page of your service. If you hover over the image you will see a trash can so single click you can delete it.

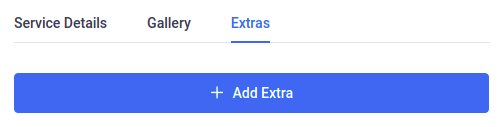
- Extras – Extras allow you possibility to add additional services or products customers can buy when they are scheduling the appointment. By click on the “Add Extra” button, new options will appear:
-
- Name – This is the place where you will enter a name for the extra,

-
- Duration – If you want to define additional services and give them a duration, this is where you do it. Duration is not required because there can be extras that your customers can buy without affecting the appointment’s duration (e.g. special equipment).
-
- Price – This is where you set a price for your extra product or service.
-
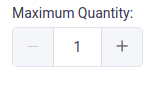
- Maximum Quantity – Here you can set the maximum number of extras that one customer can add in the booking process. For example, if you set 1, a customer will only be able to add one extra to the service. If you set more, your customers will be able to add a larger number.
-
- Multiple price by the number of people – Like the Services, the extras also have the option to choose whether their price will be multiplied by the number of people in the appointment. If you disable this option the price for extra will be the same no matter what is the number of people added in “Brining anyone with you” option. On the other hand if you enable this option the price will be multiplied by the number of people added.

-
- Description – Like in the service dialog, this is where you add a description about this extra that will appear on the “Front-end Booking Catalog”.
Additional Settings #
Some of the General Settings that are applied to all services, now can be set for each service separately from version 2.5 of Amelia. You can now set these options to be different per service: default appointments status, minimum time required before booking, minimum time required before cancelling/rescheduling, period available for booking in advance and redirect URL after booking. You will find these options when you create or edit a service under the Settings tab. By default, these settings will have the same values as in General Settings.
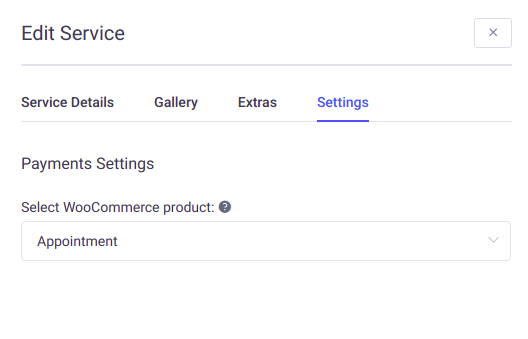
From version 2.3.1 it is possible to set different WooCommerce products for different services. By default, all services are connected to one WooCommerce product, but if you create multiple products you will be able to choose a product that will be connected to each service. Once you enable WooCommerce as a payment method, go to the Services page, open one of the services and you will see a Settings tab. When you choose this tab you will see the option “Select WooCommerce product” where you can choose a product that will be connected to this service. This way, you will be able to set different taxes and other WooCommerce options for each product and each service in Amelia.
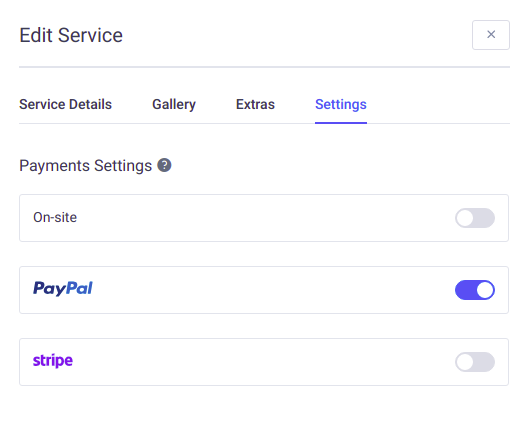
From version 2.3.1 you can also set different payment methods for each service. If, for example, you have one service for which you want your customers to pay on-site and another one that requires payment during the booking process, you can set this now. In order to see the options first you need to enable all payment methods that you want to use in Payment Settings on the Settings page. After you’ve done this, go to the Services page, open service and you will see Settings tab. Enable the payment method that you want to have for that service and click Save.
After you’ve entered all of the data, click “Save” and your service will appear on the page.
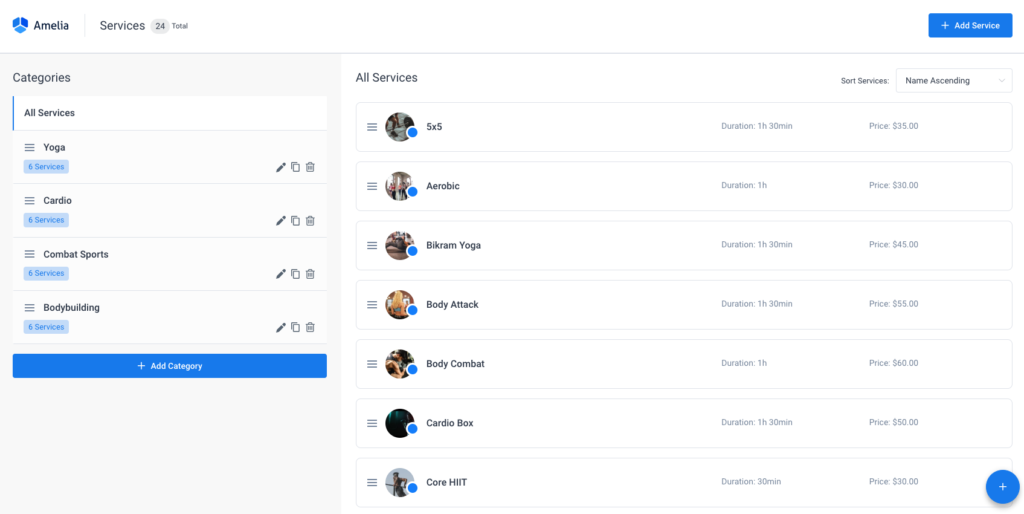
In the page header, you can see the total number of your services. You can have as many services and service extras you need, and if you have a large number of services you can filter them by clicking on the category title.
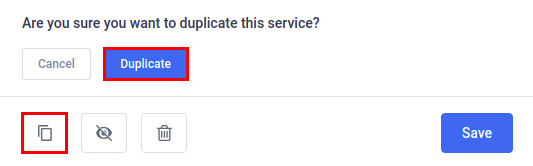
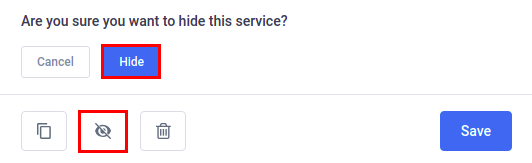
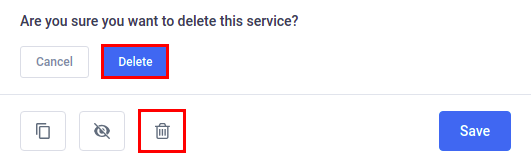
There are three more important options in the “Edit Service” dialog : “Duplicate”, “Hide” and “Delete”. The “Duplicate” and “Hide” options are available for users with administrator and manager roles, but the “Delete” option is only available for administrators.
“Duplicate” is a helpful option when you have several similar services. By using it, you won’t have to enter them all again. Open the service you want to duplicate, in the bottom left corner click on the “Duplicate” button and the same service, will open again (just the copied version).
Next to the “Duplicate” is the “Hide” button. If you don’t want to delete your service, but you will not need it for some future period, you can hide it by clicking on this button. The hidden service will still be visible on the back-end of your plugin (in a gray color and with the hidden sign), but it will not be visible on the front-end of your website.
The “Delete” option is the only available for the WordPress administrator. If you want to delete a service, click on the desired service, and in the “Edit Service” modal that appears, find the “Delete” button at the bottom left corner of the modal. Click on the “Delete” button, and one of three messages will appear depending on the number of connected appointments:
- If your service doesn’t have any connected appointments simply confirm your deleting,
- If your service has past appointments, you will see the information about the number of appointments and you will have to confirm your deleting,
- If your service has appointments in the future, you will be so informed and you will not be able to delete it.
Sorting the Services #
From 1.5 version you can sort services on the list by choosing the type of the sorting in the “Sort Service” dropdown or you can do this by drag and drop option in the list. The order that you set here will be the order in which services will appear on the front-end forms for booking.
In “Sort Service” dropdown you have four main options: Name Ascending, Name Descending, Price Ascending, and Price Descending, but you also have Custom as an option which will be automatically chosen if you move any service on the list with drag and drop option. For making the custom order by drag and drop, just click on the burger icon which you will see on each service and drag and drop the service on the list.